

“Make it a little wider” is difficult to act on. “Half chest: 54.0 cm, measured 2.5 cm below the armhole, before washing” gives the pattern maker a defined requirement to discuss.
This guide follows one original crewneck T-shirt through four connected tasks: measuring the garment, identifying its materials, locating its artwork and recording sample changes. The two downloadable workbooks use the same structure, so you can move from reading to writing your own brief.
01 / Establish the reference
Start with one style and one revision
Use a stable style ID on the cover, drawings, measurement sheet and attachments. Record the sample size and revision separately. A later sample should be traceable to the specification it was made against.
Example style: YC-TS-DEMO-04
Rev01 · Development example- Garment
- Straight-body crewneck, set-in short sleeves, straight hem
- Appearance
- Off-white body with a navy LOGO wordmark on the front; plain back
- Sample reference
- Sample A · Size label M · Measurements in cm
- Measurement condition
- Relaxed, laid flat, before washing
- Still open
- Intended wearer and fit reference, full size range, final materials, construction and approvals
Teaching example: every target, tolerance, fabric weight and artwork dimension in this guide is illustrative. “M” is a sample label, not a universal fit standard. This is a worked development brief, not an approved production pack.
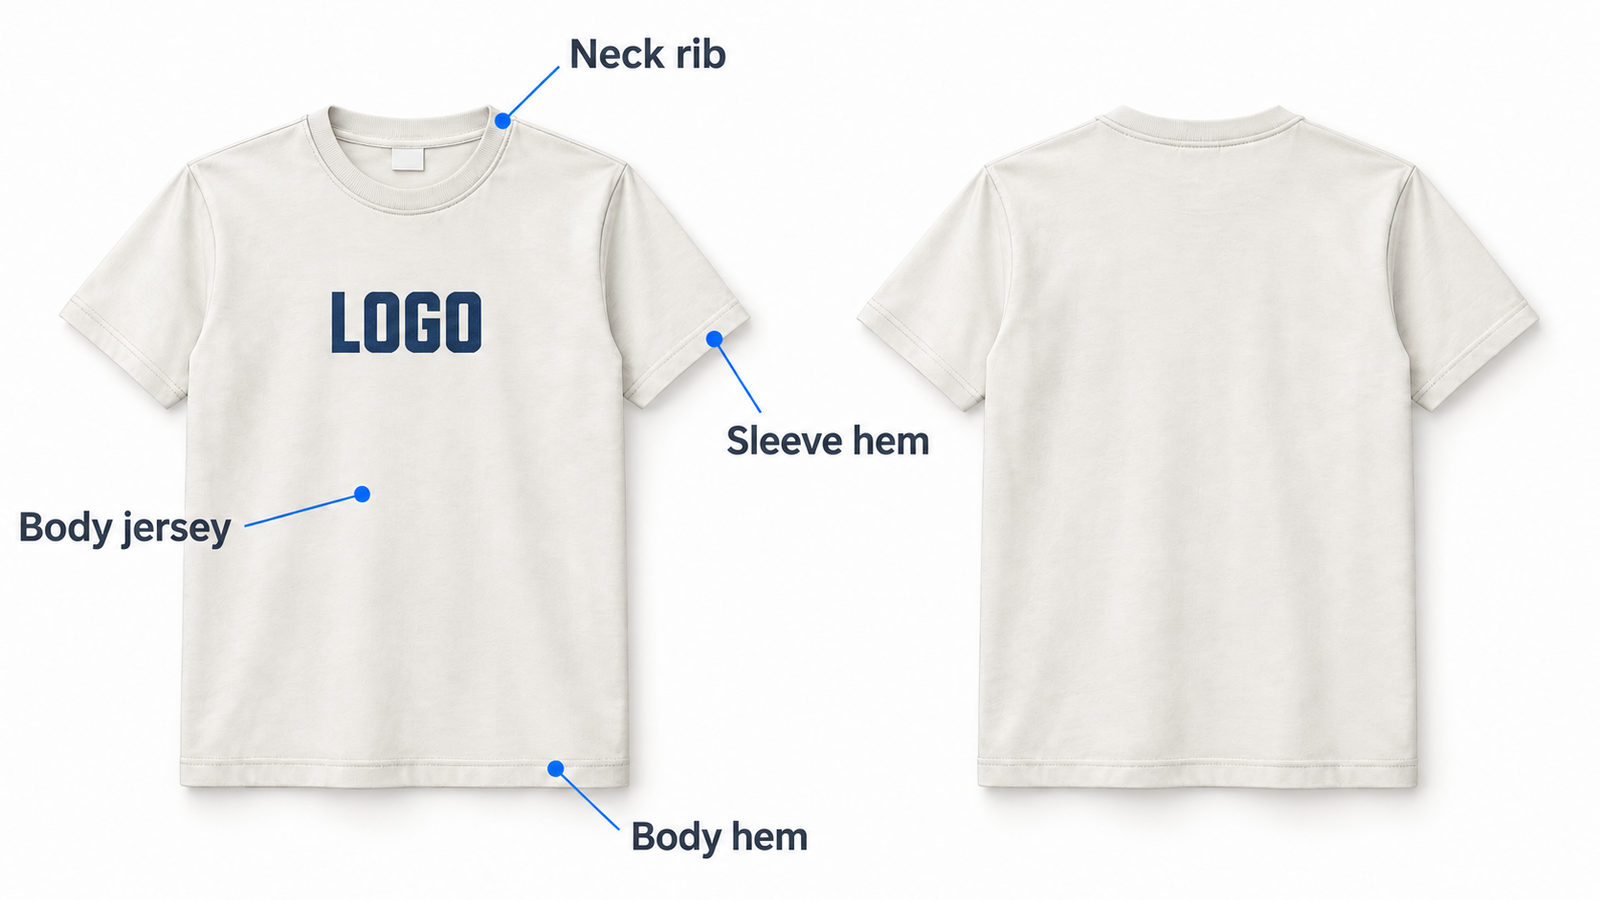
Connect a construction callout to its note or detail view. Techpacker’s annotation documentation uses this link between a sketch location and an explanatory note.[4] For this tee, the neck rib, sleeve hems and body hem each need a decision; a front-view silhouette cannot settle them all.
02 / Make the dimensions repeatable
Define the measurement before the number
A point of measurement, or POM, needs a name, two endpoints and a method. Then add the unit, garment condition, target and tolerance. Techpacker’s measurement-table guidance connects POMs with size-specific values and tolerances.[1]

| POM | Method used in this example | Target | Tolerance |
|---|---|---|---|
| A · Half chest | Straight across side edge to side edge, 2.5 cm below the lowest armhole seam point; flat and relaxed. | 54.0 | ±1.0 |
| B · Body length from HPS | From high point shoulder at the neck/shoulder seam junction, excluding neck rib, down to the bottom hem parallel to center front. | 70.0 | ±1.0 |
| C · Across shoulder | Across the back, straight between the two shoulder/armhole seam junctions, with the garment flat. | 46.0 | ±0.7 |
| D · Sleeve length | From the outer shoulder/armhole seam junction along the sleeve’s upper edge to the finished sleeve hem. | 22.0 | ±0.5 |
HPS means high point shoulder. In this brief, it is the neck/shoulder seam junction. It is not the lowest front neckline, the top of the rib or the outer shoulder. The sleeve method applies to the set-in sleeve shown; a raglan design needs its own definition.
Named dimensions matter in real supplier documentation too. Stanley/Stella’s Creator 2.0 product sheet separately identifies half chest, body length and sleeve length in centimetres.[2] The specific 2.5 cm offset and HPS method above are definitions for our example, not rules taken from that supplier.
Four POMs are a starting point
Add the measurements your design needs, such as neck width, front and back neck drop, sleeve opening, hem width and rib width. Agree each method and target. A narrow collar or a different sleeve opening can change the result even when these four measurements match.
Keep pre-wash and after-wash measurements separate
Measure the sample in the condition stated in the pack. If you also need after-wash results, record them separately with the agreed test procedure. AATCC TM150 evaluates garment length and width changes after home laundering.[7] That is a different comparison from checking an unwashed sample against its target. Agree the relevant procedure and acceptance criteria with the supplier or laboratory.
03 / Specify the components
Build the BOM beyond “cotton T-shirt”
A bill of materials identifies the components needed for the garment. Techpacker’s BOM guidance includes fabrics, trims, labels and packaging.[3] Give each component an ID and a reference that the supplier can actually locate: a swatch, material code, approved file or physical sample.

| ID / component | Example requirement | What still needs confirmation |
|---|---|---|
| F01 · Body & sleeves | Single jersey; 100% cotton; target 220 g/m²; off-white reference C01. | Physical fabric and shade references, final tolerances and approval. |
| F02 · Neck rib | 1×1 rib. | Composition, weight and recovery requirement; supplier proposal and sample review. |
| T01 · Sewing thread | Separate thread entry linked to the seams where it is used. | Type, size, color reference and compatibility with the construction. |
| L01 · Information / brand labels | Separate label entries as needed, with location and artwork version. | Dimensions, substrate, attachment and wording for the intended market. |
The proposed 220 GSM describes mass per area; it does not specify the whole fabric. Keep the body jersey and neck rib separate, and confirm any substitution before sampling. See the fabric GSM guide for the role of fabric weight.
Write construction notes that can be checked
For the neck, define the rib’s finished width, attachment and any back-neck tape. For the hems, define the turn-up and stitch appearance, then confirm the construction with the supplier. Include an enlarged drawing when the flat leaves room for interpretation.
A seam must also suit the material and use. Coats’ technical guidance connects seam design with strength, stretch, bulk, softness and thread choice.[5] A reference photograph can show the intended finish, but it does not determine a universal thread size or stitch density.
04 / Locate the print precisely
Specify artwork size and placement separately
“Small center-chest print” leaves both size and position open. Record the actual artwork width and height, its center alignment and the distance between a named garment landmark and a named artwork edge.

AW01 · Artwork instruction
Fictional dimensions · cm- Finished artwork
- 12.0 wide × 6.0 high overall; navy LOGO wordmark
- Horizontal position
- Centered on center front
- Vertical position
- Top edge 8.0 below the lowest front neckline joining seam, where the rib attaches to the body
- File reference
YC-TS-DEMO-04_AW01_Rev01.pdf
Example naming convention; production artwork is not included in the downloads.- Still open
- Exact color reference, decoration process, placement tolerance and treatment across sizes
Confirm the decorator’s file requirements and provide the original artwork file, not just its image in the tech pack. For the LOGO example, the dimensions describe the outermost printed edges of the letters, not a surrounding artboard. Obtain a sample or proof for the agreed color and process.
If you check a PDF with a paper proof, print without scaling and measure the result. Adobe distinguishes Actual size from Fit, which can resize the page.[6] This checks the paper proof’s dimensions; it does not replace approval of the decoration on the actual fabric.
05 / Turn observations into actions
Compare the sample with the agreed target
Keep the original target visible and enter the sample’s actual measurement beside it. Calculate difference = actual − target. Compare the actual value with that POM’s lower and upper limits using the same measurement method and garment condition.
Where does Sample A differ?
Difference from target · cm
Fictional teaching data
The pale band shows each POM’s example tolerance. The dot shows the measured difference.
| POM | Target | Example limits | Actual | Difference | Measurement result |
|---|---|---|---|---|---|
| A · Half chest | 54.0 | 53.0–55.0 | 55.2 | +1.2 | Outside |
| B · Body length | 70.0 | 69.0–71.0 | 69.6 | −0.4 | Inside |
| C · Across shoulder | 46.0 | 45.3–46.7 | 46.5 | +0.5 | Inside |
| D · Sleeve length | 22.0 | 21.5–22.5 | 22.7 | +0.7 | Outside |
POM D also needs review: 22.7 cm is 0.2 cm above its 22.5 cm upper limit. A measurement inside tolerance still needs fit review; it does not approve fabric, workmanship, decoration or the whole sample. See the clothing sampling guide for the wider review process.
If you decide to change the intended fit, issue a new revision and record the reason. Do not silently replace the target with the sample result. Identify the sample, revision, approval scope, approver and date when approval is actually given.
A sample size is not a graded size range
After the base fit is agreed, define targets for every required size and confirm the grading. Keep order quantities by size and color in a separate table. This example does not invent S–XL measurements or assume that one artwork placement works across the full range.
06 / Put the method to work
Download the T-shirt tech-pack workbooks
Use the blank file for your own garment and the filled file to understand the example. Both include nine sheets: Readme, Style brief, Measurements, BOM, Artwork, Sample review, Sizes & quantities, Revisions and Open decisions.
Start blank. Keep the example alongside.
The sample-review sheet calculates differences and tolerance limits from your entries. Missing inputs remain unresolved. The blank template contains no preset targets or tolerances.
No email required. Editable workbooks; cm is the default unit. Drawings, production artwork and physical reference samples must be supplied for your own style.
- Write the brief. Set the style ID, sample purpose, intended wearer and fit reference.
- Define the inputs. Add garment-specific POMs, material references and artwork instructions. Assign unresolved items to an owner.
- Agree the sample scope. Confirm which inputs are approved and which the supplier is being asked to develop.
- Review without overwriting. Enter sample actuals, record comments and issue a traceable revision when requirements change.
Before you send the pack
A development request can contain open decisions if the supplier knows exactly what it is being asked to propose. Make the open items visible and distinguish a request for sampling from approval for production.
Your handoff check
0 of 8 checkedUse this to check the brief’s contents. It does not certify a sample or approve production.
Checks stay on this page only and reset when you reload.
T-shirt tech-pack questions
Is half chest the same as a body chest measurement?
No. Half chest is a flat garment width measured at a defined position. Body chest is a circumference around the wearer. Give each its own name and method; do not enter one in the other’s field.
Can I use this example’s size M measurements?
Use them to understand the workflow. Define your actual targets from the intended fit and wearer, then validate them through development. The example’s M label, dimensions and tolerances are not a recommended size standard.
Does a tech-pack template include a sewing pattern?
This template does not. It organizes the garment requirements and sample review. Pattern development is a separate deliverable to agree with your pattern maker or supplier; the illustrations are not cutting patterns.
Can I send the pack while the print process is undecided?
Yes, as a development request: identify the artwork, intended appearance and questions for the supplier. Record the proposed process, color reference and sample checks, then approve those details before the relevant production step.
How many pages should a T-shirt tech pack have?
Use enough space to make the garment unambiguous. A simple tee may need fewer detail views than a paneled or embellished style. Completeness depends on the decisions and references, not a fixed page count.
Sources & example notes
Primary sources checked on 2 October 2026. They support the documentation and measurement principles cited above. The YC-TS-DEMO-04 dimensions, tolerances, BOM proposal, artwork and sample results are original teaching examples.
- Techpacker — How to create measurements tableNamed POMs, sample size, size-specific values and tolerances.
- Stanley/Stella — Creator 2.0 STTU169 product sheet, page 3Supplier example of named half-chest, body-length and sleeve-length measurements in cm. Its size values are not used in the worked example.
- Techpacker — How to create material tableBOM organization and component categories.
- Techpacker — How to Annotate on a Card SketchConnecting sketch callouts with explanatory notes.
- Coats — Soft and Secure SeamsGeneral seam-performance principles. Product-specific thread recommendations are not adopted here.
- Adobe — Adjust page size for printingActual-size versus scaled PDF paper printing.
- AATCC — TM150-2025: Dimensional Changes of Garments after Home LaunderingPublic purpose-and-scope abstract. The full paid procedure is not reproduced, and no universal acceptance limit is inferred.
A useful sample comment
Sample A / Rev01 / POM A: Half chest measures 55.2 cm against a 54.0 cm target and ±1.0 cm example tolerance. It is 0.2 cm above the upper limit. Please recheck using the agreed 2.5 cm armhole offset, identify the cause and propose a correction against the 54.0 cm target. Attach a measurement photo.