

A hoodie can match the chest measurement and still feel wrong. The shoulder may extend too far, the hood may pull at the neck, or the cuff may stay loose after the wearer pushes it up.
A useful hoodie tech pack connects those details. This guide focuses on the decisions specific to hoodies, with an adult pullover as the visual example and separate instructions for a zip-up. Use the downloadable workbook to turn each decision into a requirement the sample team can check.
01 / Choose the construction
Start with pullover or zip-up, then define the silhouette
Record the wearer, intended fit, sample size and size range before describing the details. “Oversized” is a direction, not a measurement. Specify the shoulder construction, body shape, sleeve shape, finished length and how the waistband should sit.

| Decision | Pullover | Full zip-up |
|---|---|---|
| Front construction | Define neckline opening and hood overlap, if used. | Define opening length, zipper position, tape coverage and top/bottom finish. |
| Locate the kangaroo pocket and both hand openings. | Locate each pocket relative to the center opening; check left/right alignment. | |
| Waistband | Specify finished height, relaxed width and attachment. | Add the finish at each zipper end and the alignment when closed. |
| Artwork | Check clearance from the neck, pocket and seams. | Define whether artwork stops before the zipper or crosses it, with decorator approval. |
The reference used here
Adult pullover, dropped shoulder, two-panel self-lined hood, no drawcord or eyelets, kangaroo pocket, rib cuffs and waistband. The ivory body and navy LOGO show the design direction. Fit targets, fabric specifications and approvals remain project-specific. The images are not drawn to scale.
If you need the overall document structure first, use the clothing tech pack guide. Here, the focus is what to add or clarify for a hoodie.
02 / Define the fit
Measure shoulder, sleeve and body as a connected set
On a dropped-shoulder hoodie, the sleeve starts farther from the neck than on a conventional set-in shoulder. A shorter sleeve measurement can therefore accompany a similar overall reach. Do not compare sleeve lengths from different starting points as if they describe the same fit.
Give each point of measure (POM) an ID, start and end landmarks, method, unit, garment condition, target for each size and allowed minus/plus tolerance. Techpacker’s measurement-table documentation supports separate measurement entries, sizes and tolerances.[1] The methods below are definitions to agree for your style, not universal sizing rules.
| POM | Define in the pack | Check alongside it |
|---|---|---|
| Half chest | Side edge to side edge, straight across; name the vertical offset below the armhole. | Armhole depth, body shape and intended layering. |
| Body length | Named high point shoulder at the neck/shoulder seam junction to the finished bottom edge; state that waistband is included. | Waistband height and where the hem sits on the wearer. |
| Across shoulder | Across the back between shoulder/armhole seam junctions, with the garment flat. | Sleeve length and armhole shape. Use another method for raglan sleeves. |
| Sleeve length | Shoulder/armhole seam junction along the upper sleeve edge to the finished cuff edge; cuff included. | Shoulder extension, cuff height and on-body reach. |
| Cuff / hem opening | Flat width at the finished opening, relaxed; measure any extended condition separately using an agreed method. | Comfort, extension and recovery after wear or testing. |
| Pocket position | Named neck landmark to the top pocket attachment line at center front; add pocket width, height and opening length. | Hand access, waistband clearance and artwork position. |
Lay the hoodie flat and relaxed in the stated condition. Identify whether it is before or after washing. Show an annotated measurement photo if a curved edge or bulky seam makes the route ambiguous. Avoid assigning one tolerance to every measurement simply because it is easy to enter.
Review movement as well as the table
Fit the sample on the agreed wearer or fit form with the intended underlayer. Check reaching forward, lifting the arms, putting the hood up and using the pockets. Record where a problem occurs before asking the pattern maker for a correction. Adding chest width alone may not resolve a restriction in the armhole.
03 / Describe the hood
Specify hood shape, lining and the front edge separately
“Double-layer hood” describes layers. It does not tell the team how many pattern panels make the outer shell. A two-panel shell can have a matching two-panel lining; a three-panel shell adds a central strip. Record shell construction and lining construction separately, supported by front, side and back views.
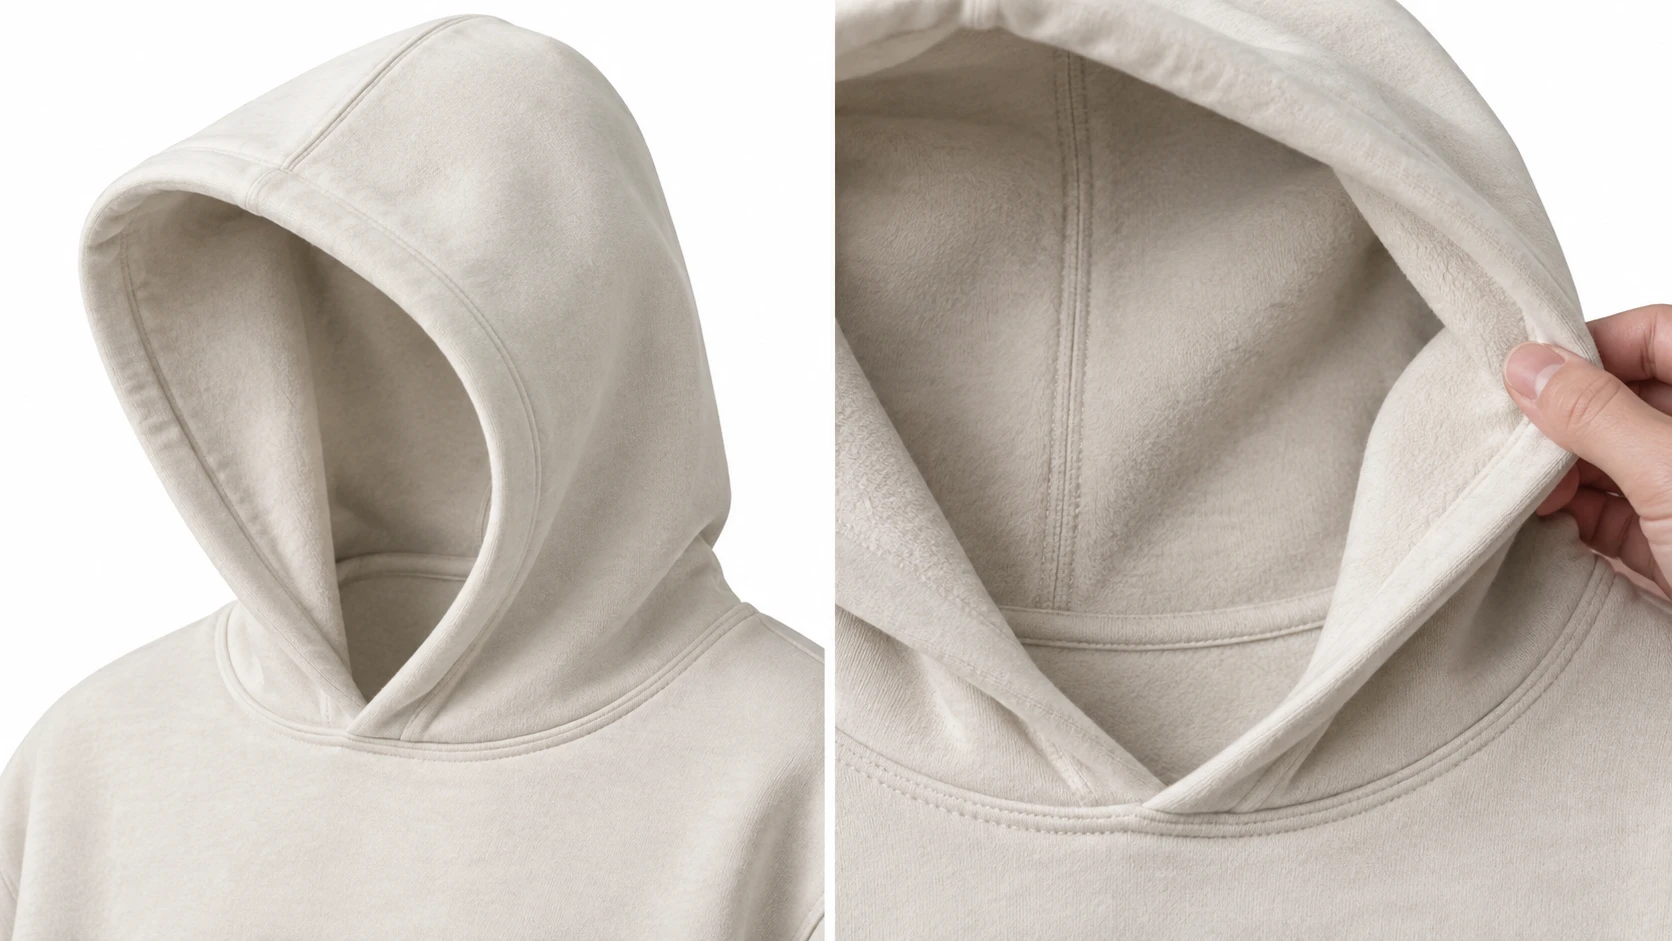
Shape and opening
Name hood height and depth landmarks on the side view. State whether the route is straight or follows the edge. Define the face opening and the overlap at center front independently.
Lining and seams
Give the lining its own BOM entry, even when it uses the same fabric as the shell. Specify the inside finish, face-edge stitching and neck-seam treatment. Review seam bulk with the hood both up and down.
Cord system, if used
Record cord material, width or diameter, finished length, exposed length and the eyelet/channel arrangement. Add attachment, reinforcement, end finish and approved component references. “Matching cord” leaves those decisions open.
Do not infer hood comfort from a flat dimension alone. Check head movement, visibility around the face and pulling at the neckline. For the no-cord example, write “No drawcord; no eyelets” explicitly rather than leaving those BOM rows ambiguous.
Adult and children’s briefs need separate review
This guide’s example is for adults. CPSC identifies hood or neck drawstrings in children’s upper outerwear in sizes 2T–12, or equivalent sizes, as a substantial product hazard.[2] Do not scale an adult cord design into a children’s range. Confirm the requirements for each destination market before specifying children’s trims.
04 / Connect materials to construction
Give rib, pockets and zippers their own requirements
The body fabric’s GSM does not describe the whole hoodie. Record composition, knit structure, finish, color reference and any agreed testing alongside mass per area. Identify whether the inside is loopback or brushed, and approve the actual hand feel. Our fabric GSM guide explains the role of weight.
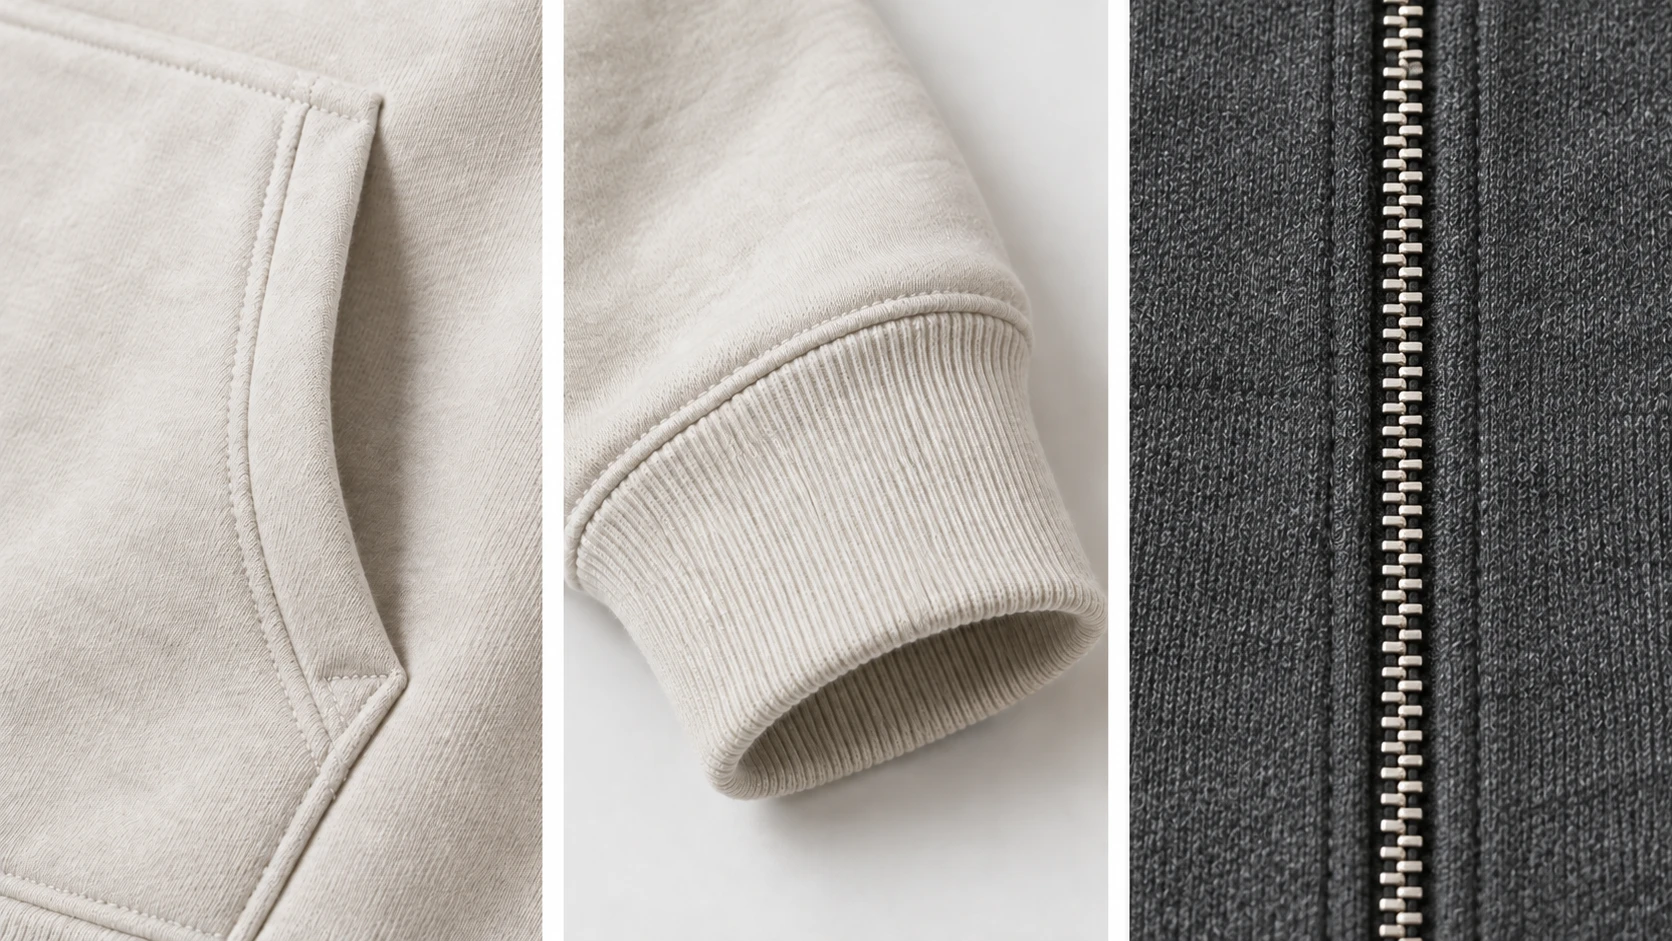
Rib: specify the component and its behavior
Record rib composition, structure, weight or supplier reference, color, finished cuff/waistband height and relaxed opening. Agree the required extension and recovery method with the supplier, then review the sample after the stated use or test. There is no single rib-to-body ratio that this guide can responsibly assign to every fabric and fit.
Also define the joining seam and visible stitch appearance. Coats connects seam performance with strength, stretch, bulk and softness, with thread choice affecting the result.[3] Ask for the proposed seam/thread specification against the chosen fabrics; a close-up alone does not specify it.
Pocket: locate both the shape and the openings
Document pocket width, height, top position, hand-opening length and opening finish. Mark reinforcement locations on the drawing. Check hand access while wearing the hoodie and inspect whether the pocket distorts the front. If artwork sits above it, moving the pocket changes the decoration space too.
Zipper: order a defined component, not just “silver zip”
For a full zip-up, identify the separating/open-end type, one-way or two-way operation, supplier product code, chain type and size, slider/puller, tape color, finish and length for each garment size. Confirm wash or garment-dye compatibility if those processes are planned.
State how length is measured. YKK’s manual distinguishes zipper dimension from tape extensions. For its conventional open-end example, dimension A runs from the slider’s top end to the box end, measured with the zipper closed and flat; other types use different endpoints.[4] Confirm the method for the exact product code rather than ordering from total tape length.
On the assembled sample, check smooth operation, fabric catching, front-edge waviness and left/right alignment at the waistband and pockets. A correct loose zipper length does not establish a correct finished front.
05 / Reserve decoration space
Check artwork against the pocket before approving placement
Give the print or embroidery a file ID and revision, overall finished width and height, center alignment and a placement landmark. For this calculation, the vertical landmark is the lowest front hood-to-body joining seam at center front. It is not the outer folded edge of the hood.
The example below uses a 24 cm distance from that landmark to the pocket’s top attachment line, an 8 cm offset to the artwork’s top, and 6 cm artwork height. All are fictional teaching inputs. The nominal gap below the artwork is 24 − 8 − 6 = 10 cm.
Interactive example · cm
How much space remains above the pocket?
24 − 8 − 6 = 10 cm
| Situation | Neck to pocket | Top offset | Artwork height | Nominal gap |
|---|---|---|---|---|
| Starting example | 24 | 8 | 6 | 10 |
| Taller graphic | 24 | 8 | 12 | 4 |
| Pocket moved 3 cm up | 21 | 8 | 6 | 7 |
A positive result only means the specified edges do not overlap vertically at nominal dimensions. Confirm horizontal clearance too. For embroidery, approve a sew-out on the intended material and backing, checking distortion and inside comfort. For a zip-up, agree the treatment of any design crossing the center opening. Recheck placement after a pocket, length or size-grade change.
06 / Review the assembled sample
Turn a sample comment into a traceable correction
Identify the style, revision, sample ID, size and condition before recording findings. Keep the target beside the actual measurement. Photograph the hood in profile, the neckline, cuff and pocket openings, and the closed front of a zip-up. Separate a measurement deviation from a fit preference or a workmanship issue.
Keep wash review separate from the initial fit check
Where laundering performance is part of the brief, agree the procedure, number of cycles, drying method and acceptance criteria before testing. AATCC lists TM150 for garment dimensional changes after home laundering and TM143 for appearance after home laundering.[5] Naming a test method does not set a passing limit or mean the sample was tested.
Record before/after measurements and inspect hood lining, rib, pocket shape, zipper front and decoration under the agreed review plan. Different outcomes need different corrections. Preserve the sample and report references so the next reviewer can understand the decision.
Before locking a revision, close the relevant material, fit, construction and artwork decisions. Record who approved what and when, with the exact files and physical references. Use the clothing sampling guide for the broader approval sequence.
07 / Build your own brief
Download the hoodie tech pack starter workbook
One workbook for the details that need agreement
Six sheets cover the style brief, measurement methods and targets, materials and construction, artwork clearance, sample review and revision history. Amber cells are editable. Targets and tolerances start blank.
Original starter template. Attach your drawings and production artwork separately. The workbook does not supply a pattern, a graded size chart or approved production specifications.
- Assign the style ID and revision. Choose pullover or zip-up, intended wearer, fit reference and sample size.
- Agree each POM method and garment condition. Enter size-specific targets and tolerances; duplicate measurement rows for additional sizes.
- Link components to their construction details. Identify the hood lining, rib, pocket and zipper separately where applicable.
- Enter artwork dimensions and placement, then document decorator confirmation. Review the sample and log every agreed change.
Before sending, check that the drawing, workbook and attachment filenames refer to the same revision. Every unresolved item needs an owner and next action. A blank cell should not silently become a supplier’s decision.
Review your hoodie construction brief
Bring your drawings, fit reference and unresolved hood, rib or pocket details. Use the custom hoodie development page to explore the product scope, or send the brief for discussion.
Discuss your hoodie briefHoodie tech pack questions
Can I use one tech pack for a pullover and a zip-up?
You can reuse the document structure. Give each variant an identifiable style or version and its own front construction, pocket, trim and measurement requirements. An added zipper changes more than the BOM.
Does a double-layer hood mean a three-panel hood?
No. Layers describe outer material and lining. Panels describe how each layer is shaped and assembled. Specify both so the pattern maker does not need to infer the construction.
What sleeve measurement should a drop-shoulder hoodie use?
Name the starting point and route. One option is the shoulder/armhole seam junction to the finished cuff edge, with cuff included. Review it alongside shoulder width and fit. A measurement starting at center back is a different POM.
How much space should I leave above a kangaroo pocket?
There is no universal clearance supplied by this guide. Calculate the available gap from named edges, then agree seam clearance and decoration access for the chosen process, material and sizes. The 10 cm result shown here is fictional arithmetic, not a recommended minimum.
Can I send the workbook without drawings?
The workbook records requirements but does not replace drawings. Attach front, back and hood side views plus enlarged details for ambiguous seams, pockets, trims and decoration. Match their revisions to the workbook.
Sources and technical references
Primary sources checked on 5 October 2026. Supplier documentation supports the specific points cited; it does not prescribe the example hoodie’s fit or approve its construction. The clearance calculations are original fictional examples.
- Techpacker — How to create measurements tableMeasurement entries, size columns and tolerance fields.
- U.S. CPSC — Drawstrings in Children’s Upper OuterwearU.S. guidance on hood and neck drawstring hazards and covered sizes. Not a complete international compliance review.
- Coats — Soft and Secure SeamsSeam strength, stretch, bulk, softness and sewing-thread selection.
- YKK — Zipper Usage Instruction ManualSection 1-2, printed page 02 (PDF page 4): zipper measurement endpoints and tape extensions.
- AATCC — Standard Test Methods and ProceduresTM150 for garment dimensional change and TM143 for appearance after home laundering. Consult the applicable full method for testing.
Example comment: the hood pulls at the neck
Sample A / Rev01 / hood fit: With the hood up on the agreed fit wearer, turning the head pulls the front neckline upward. Please review the hood depth, face opening and neck attachment together, propose the pattern correction and identify affected POMs. Attach side-view photos of the next sample with the hood up and down. Keep the existing targets visible until a revised specification is agreed.