
01
Start with the operation, then name the stitch
For a product developer, the useful question is what the seam must do at that location. Are you joining two body panels, turning up a sleeve edge, attaching a rib cuff or covering an existing join? Those tasks can require different assemblies even when the outside looks similar.
| Description | What it explains | What to record |
|---|---|---|
| Stitch formation | How the sewing threads interlace or interloop | Proposed code, then technician-confirmed code |
| Seam assembly | How the fabric pieces and folds are arranged | Section sketch or physical reference; exposed and enclosed edges |
| Finished operation | What this construction does on the garment | Location, appearance, movement and acceptance requirement |
A&E’s seam matrix links fabric arrangements to operations and possible stitches. This is why a stitch number alone cannot explain where a fold goes or whether the work involves one operation or several.[2]
Keep the sewing-machine name in the production discussion, but do not use it as the whole buyer brief. If two suppliers interpret “double needle” differently, a face photo, reverse photo and assembly detail give them something specific to reconcile.
02
Look at the outside and inside together
Start with a clean, relaxed sample. Photograph the whole garment location first, then the same seam close up on both sides. Include a scale when dimensions matter. A close-up with no location can make a sleeve hem look like an unrelated trim detail.
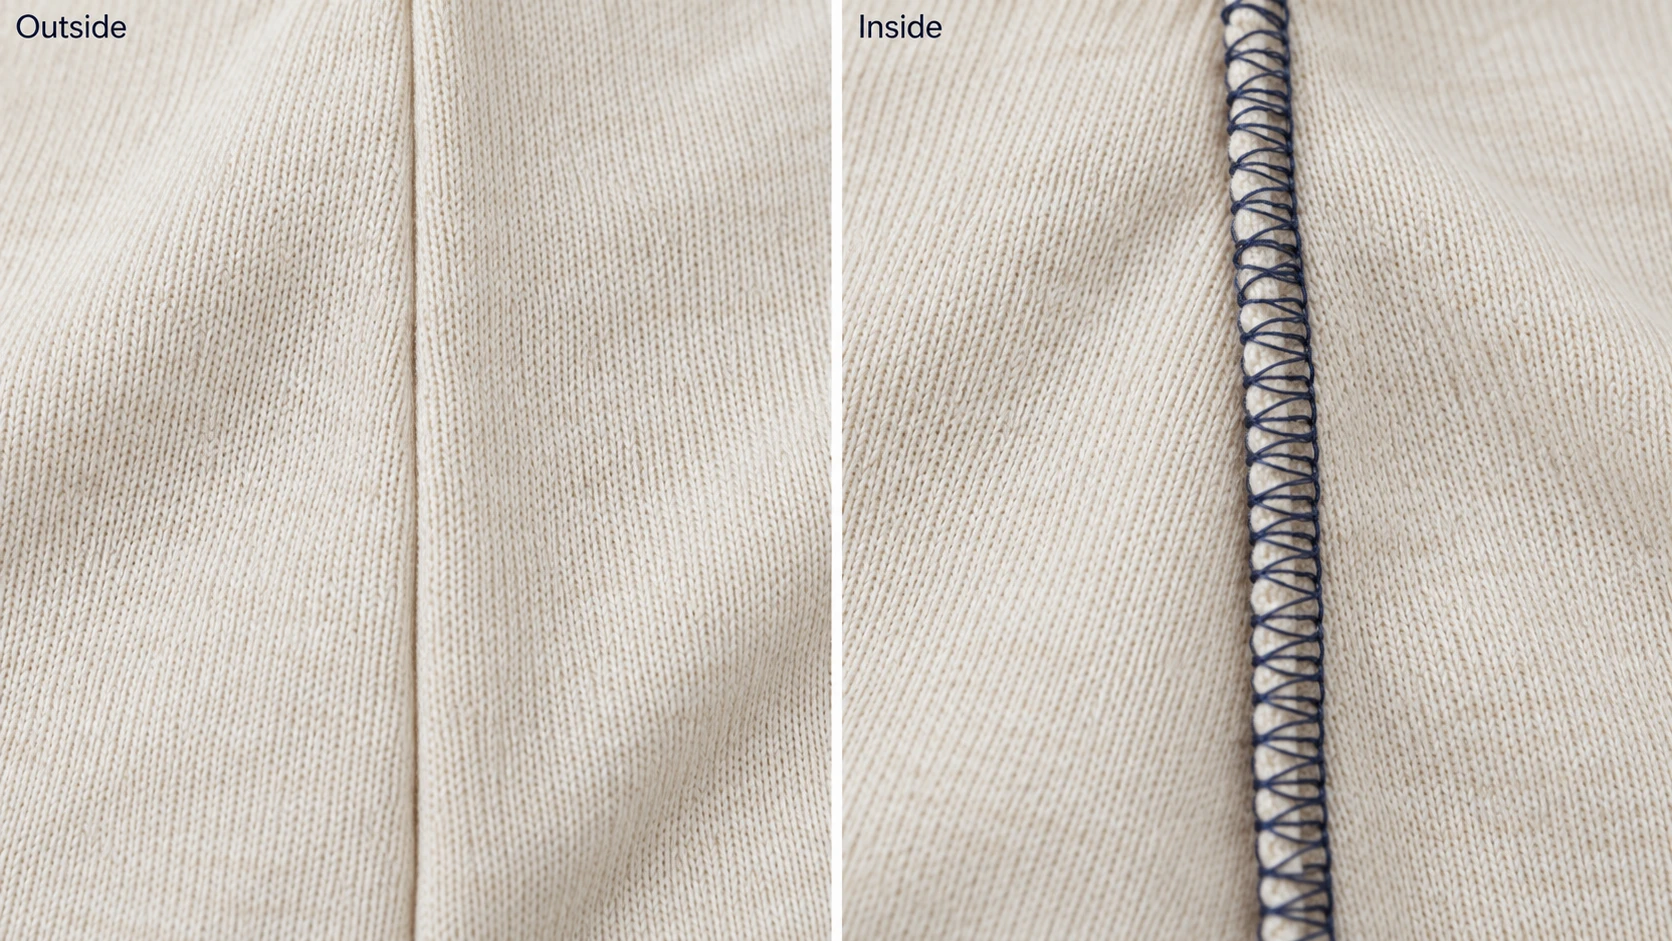
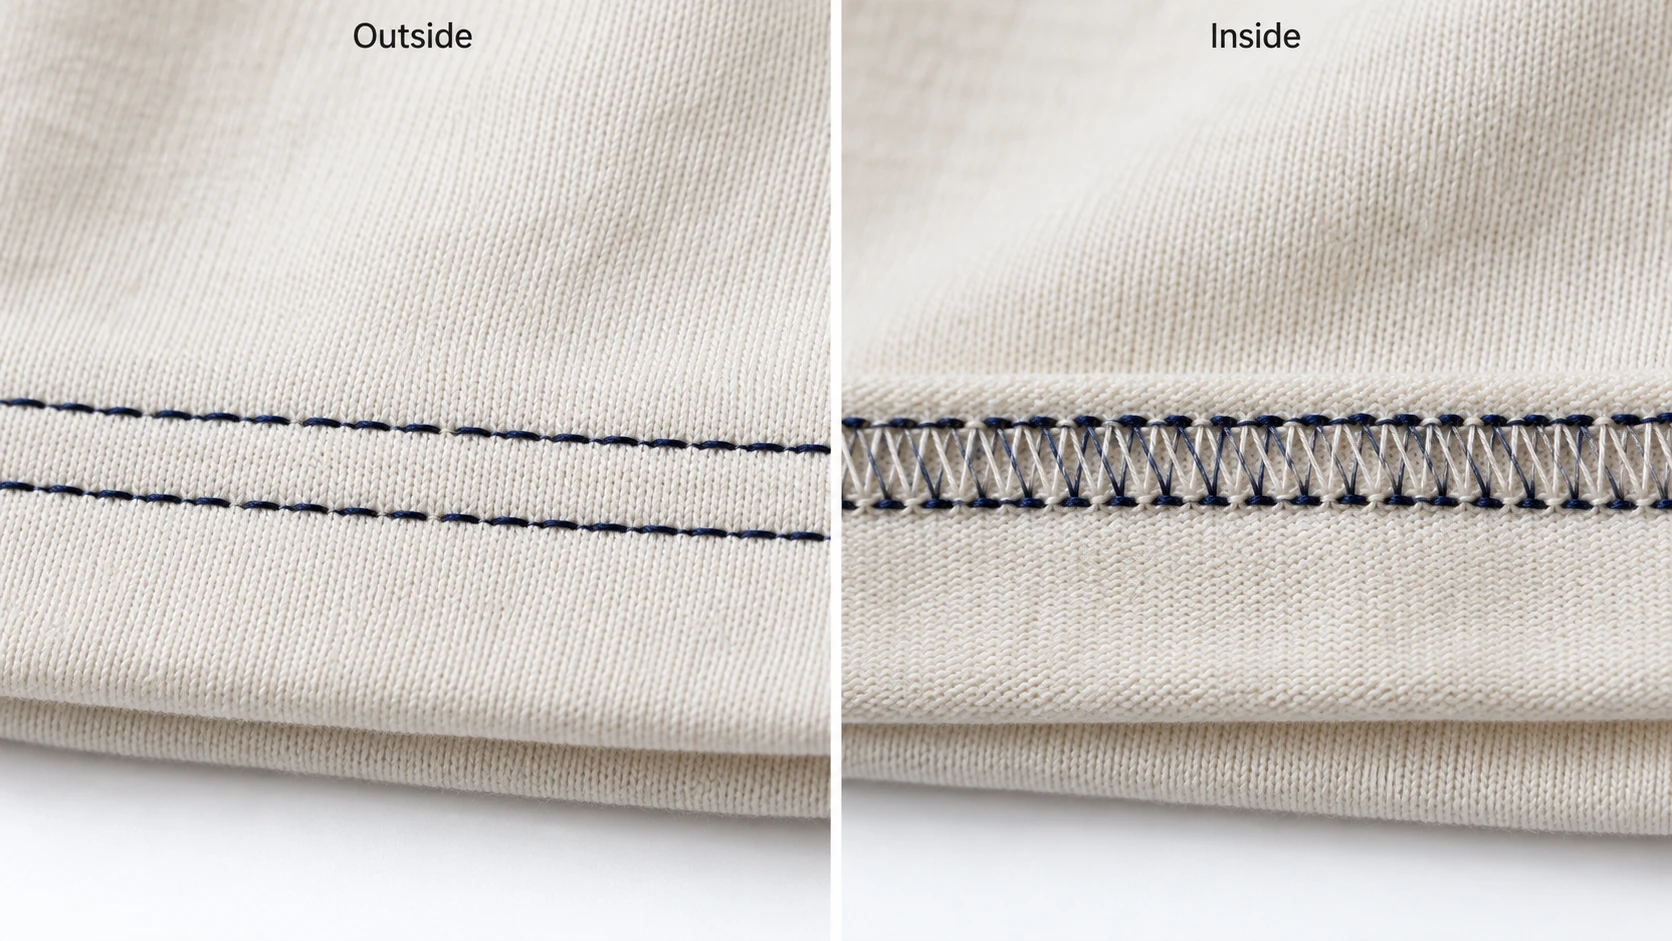
Do not approve a construction from the outside image alone. Ask where the raw edge ends, how the allowance lies and what happens at the start/finish overlap. An attractive surface can hide an assembly that differs from the intended reference.
JUKI lists T-shirt sleeve and bottom hemming among the applications for its coverstitch equipment.[3] For your brief, identify the actual finish: a turned-up sleeve edge and a separately attached rib cuff are different operations.
03
Choose by garment location
Use the following table to organize a development discussion. These are candidate routes to review with the sewing team, not mandatory constructions for every T-shirt or hoodie. A style with exposed decorative seams may intentionally need a different appearance.
| Location | Candidate route to discuss | What the sample must resolve |
|---|---|---|
| Shoulder join | A panel-joining seam; define any tape or subsequent covering as a separate operation | Allowance direction, stabilization if required, bulk and skin contact |
| Side seam / underarm | Overedge joining where suitable for the nominated knit | Join security, allowance presentation and behavior at the underarm intersection |
| Sleeve opening | Coverstitched folded hem OR a separate cuff attachment | Which finish is intended; opening behavior and thickness at the crossing seam |
| Body opening | Coverstitched folded hem OR a separately attached waistband | Finished depth, edge coverage, hang and behavior at side-seam crossings |
Build the location brief
- ShoulderJoin + any tape or covering
- Side / underarmJoin + intersection detail
- Sleeve openingFolded hem or attached cuff
- Body openingFolded hem or attached band
For a hoodie, add each relevant junction to the brief: for example, a cuff crossing the sleeve seam or a waistband meeting the body side seam. Review those areas on the assembled sample, not only on a straight, single-thickness test strip.
The T-shirt tech pack example and hoodie tech pack guide provide the wider document structure. Use this location review to make their construction notes more precise.
04
Resolve “flatlock” before approving it
If a supplier offers “flatlock,” ask for the stitch code, both views and the fabric arrangement. Establish whether the proposal is a flatseam join, a join followed by covering, or an overedge construction opened out for a flat appearance. Do not accept the commercial name as proof that these alternatives are equivalent.
| Code | Formation identified by Coats | Use in your brief |
|---|---|---|
| 406 | Two needle threads and one looper thread; twin-needle coverseam | Specify the associated fold or attachment |
| 514 | Four-thread overedge, full cover | Confirm the joining assembly and edge width |
| 607 | Four needles, one looper and one top-cover thread; flatseam | Confirm the fabric arrangement and required surface coverage |
These definitions come from Coats’ stitch guide.[1] They are selected examples, not a complete stitch catalogue. Visible rows do not reveal every thread or the fabric assembly.
For an activewear-inspired hoodie, retain a small physical reference if a low-profile, skin-facing join is central to the design. Mark which side faces the body. Ask the supplier to explain any proposed substitute and review it before updating the approved construction.
05
Give every dimension its own name
“Make it 6 mm” is incomplete unless the drawing identifies what is being measured. A&E lists hem width and needle spacing as separate requirements for a knit hemming construction.[2] Give each dimension its own callout and unit; do not transfer a value from one field into another.
| Field | Meaning to show on the drawing | Common ambiguity |
|---|---|---|
| Seam allowance | Fabric allocated between a defined joining line and cut edge | Cut allowance versus the amount remaining after trimming |
| Overedge width | The bite/width of the overedge formation, with measuring landmarks | Confused with the original cutting allowance |
| Needle spacing | Distance between specified needle rows; state which rows | “Double needle” used without a spacing requirement |
| Finished hem depth | Depth of the turned hem from the finished fold to its defined upper edge | Confused with distance between rows |
| Stitch density | Stitches counted over a stated length and sample condition | An unqualified number without stitches/inch or stitches/cm |
Have the technician confirm which measurements are relevant and feasible for the proposed construction. Record an approved target and tolerance where the product needs one. A reference photograph with a ruler does not replace the agreed measuring landmarks.
This guide supplies no universal needle spacing, stitch density, seam allowance or tension setting. Those values need to suit the actual material, assembly and approved result.
06
Review the result, not just the number of rows
Coats discusses seam strength, extension, appearance, bulk and softness as related design requirements.[4] A neat-looking line is therefore one part of the review. For a skin-facing seam, also examine the inside surface; for an opening, consider the movement the garment must accommodate.
A&E’s thread-selection guidance likewise separates sewability, performance and appearance.[5] Ask the sewing technician to nominate thread and needle details for the actual fabric. Increasing thread size or stitch density without a trial is not a complete correction plan.
| Look at | Record | Request next |
|---|---|---|
| Relaxed appearance | Location and extent of waviness, tunneling, gaps or uneven coverage | A controlled trial with identified changes |
| Intended movement | Where restriction, broken stitches or opening appears | Agreed assessment condition and a revised sample |
| Inside feel / bulk | Exact area of a raised allowance or bulky crossing | Alternative assembly or finishing detail to review |
| After agreed care | Sample ID, procedure and changed appearance or dimensions | Comparison with the same approved reference and condition |
A hand check is useful for spotting a problem; it does not establish a standardized extension or strength result. If a measured performance requirement is needed, agree the applicable method, specimen, conditions and acceptance criterion with the technical or testing team. Keep the result linked to the sample that was actually assessed.
08
Create a seam brief the sewing team can use
Use one record per location and construction revision. The editable worksheet holds the material reference, operation, outside/inside evidence, dimensions, technical confirmation and sample decision. Blank fields stay “not recorded”; completing the form does not approve production.
Prepare a brief and discuss the construction with Yuchen when the garment, fabric and desired finish are clear. If you only have an inspiration image, identify the uncertain details and ask for a physical trial before treating it as a final specification.
Garment seam specification and sample review
Fill in the record, export it to continue later, or print your completed brief. No account is required.
Open the editable worksheet ↗Download blank text brief09
Questions buyers ask about stitching
Can the same T-shirt use overlock and coverstitch?
Yes. A garment can use different constructions for panel assembly, hems and other operations. Record them by location so one general instruction does not replace the whole construction table.
Are two visible rows enough to identify coverstitch?
No. Obtain the reverse view and technical confirmation. Visible rows alone do not establish the thread formation or how the fabric is assembled.
Is flatlock automatically more comfortable?
Evaluate the actual skin-facing surface, fabric, thread and junctions. The label alone does not establish comfort, and a flat-looking reference does not specify its construction.
Should I write a stitch code if I am unsure?
Mark it as proposed or leave it for technical confirmation. Supply the intended operation, reference views and desired result. Do not turn an unverified guess into a production requirement.
Sources & further reading
Sources checked 17 October 2026. Technical references explain stitch formations and construction choices. They do not approve the settings or performance of a particular garment.
- Coats — Basic Stitch TypesStitch formations and terminology, including 406, 514 and 607. These codes identify formations, not a complete garment specification.
- American & Efird — Seam Type MatrixDistinguishes seam assemblies, operations and stitch selections; lists hem width and needle spacing separately. Published matrix dated 2006, used for construction concepts rather than current standard compliance.
- JUKI — MF-7900/7900D U11 applicationsManufacturer identifies T-shirt sleeve and bottom hemming, plus covering operations, as applications. This does not establish which equipment Yuchen uses.
- Coats — Soft and Secure SeamsDiscusses strength, extension, appearance, softness and bulk as related seam requirements. Supplier thread examples are not universal production settings.
- American & Efird — Thread Selection LogicFrames thread selection around sewability, seam performance and appearance, including end-use and quality concerns.
07
Replace a vague correction with an actionable request
Instead of “improve hem quality,” write a comment that identifies the location, observation and required next step. The example below illustrates the format; it is not a real inspection finding or an approved production instruction.
Illustrative sample comment · sleeve opening
Observation: The folded hem forms a ridge between the visible rows at the underarm crossing.
Reference: Detail S03; outside and inside photos; sample ID and revision recorded in the worksheet.
Request: Review the crossing and proposed construction with the sewing technician. Return a trial in the nominated fabric, state what changed and retain the original sample for comparison.
Approval pending: Review relaxed appearance, opening movement and the agreed post-care condition before updating the construction note.
Keep observed defects separate from design changes. “The current sample differs from the approved detail” and “we now want a different finish” require different decisions. Name the change, its owner and the next sample revision so the factory does not work from competing instructions.
Once accepted, update the detail drawing, construction table and retained reference together. A photo sent in a message should not silently override the controlled technical pack.